Posts made by ChrisWR
-
RE: Using CardKB (not hat) with M5StickCposted in M5 Stick/StickC
#include <M5StickC.h> #include <Wire.h> #define CARDKB_ADDR 0x5F void setup() { M5.begin(); Serial.begin(115200); Wire.begin(); M5.Lcd.fillScreen(BLACK); M5.Lcd.setRotation(3); M5.Lcd.setCursor(1, 10); M5.Lcd.setTextColor(YELLOW); M5.Lcd.setTextSize(2); M5.Lcd.printf("IIC Address: 0x5F\n"); M5.Lcd.printf(">>"); } void loop() { Wire.requestFrom(CARDKB_ADDR, 1); while(Wire.available()) { char c = Wire.read(); // receive a byte as characterif if (c != 0) { M5.Lcd.printf("%c", c); Serial.println(c, HEX); // M5.Speaker.beep(); } } // delay(10); } -
RE: How could I make text to speech using the speaker?posted in SOFTWARE
Try this for the M5stickC could work, ...
#include <M5StickC.h> #include <Arduino.h> #include <ESP8266SAM.h> //https://github.com/earlephilhower/ESP8266SAM #include <AudioOutputI2S.h> //https://github.com/earlephilhower/ESP8266Audio AudioOutputI2S *out = NULL; void setup() { out = new AudioOutputI2S(0, 1, 32); out->begin(); } void loop() { ESP8266SAM *sam = new ESP8266SAM; sam->Say(out, "Can you hear me now?"); delay(500); sam->Say(out, "I can't hear you!"); delete sam; } -
RE: How could I make text to speech using the speaker?posted in SOFTWARE
This works on the M5stack, for the stickC I cannot test tho..
#include <M5Stack.h> #include <M5StackUpdater.h> #include <Arduino.h> #include <ESP8266SAM.h> //https://github.com/earlephilhower/ESP8266SAM #include <AudioOutputI2S.h> //https://github.com/earlephilhower/ESP8266Audio AudioOutputI2S *out = NULL; void setup() { M5.begin(); Wire.begin(); if(digitalRead(BUTTON_A_PIN) == 0){ Serial.println("Will load menu binary"); updateFromFS(SD); ESP.restart(); } out = new AudioOutputI2S(0, 1, 32); out->begin(); } void loop() { ESP8266SAM *sam = new ESP8266SAM; sam->Say(out, "Can you hear me now?"); delay(500); sam->Say(out, "I can't hear you!"); delete sam; } -
RE: How to change LCD print text on runtime without creating another lineposted in Arduino
@andreaf said in How to change LCD print text on runtime without creating another line:
M5.Lcd.print("some text")
M5.Lcd.setCursor(xposition , yposition);
M5.Lcd.print("some text")or ;
M5.Lcd.drawString("some text"), xposition , yposition , txtsize);
-
RE: M5Stack Fire and M5 Piano?posted in Modules
get a proto and build the 15 pins female port in it..
-
RE: M5-bit (Micro-Bit) part 2posted in PROJECTS
@ajb2k3 Its not uiflow, its makecode (for micro-bit) and arduino for m5
-
RE: MediaPlayerposted in PROJECTS
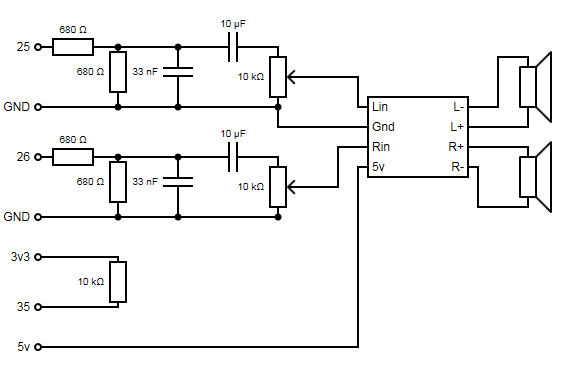
Stereo is working (now with the latest update) when pin 35 is pulled high.
I made this and tested it ;
-
M5-bit (Micro-Bit) part 2posted in PROJECTS
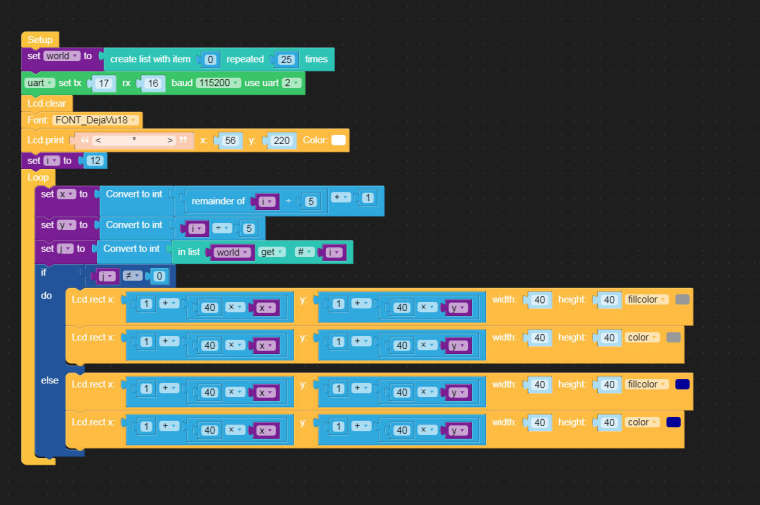
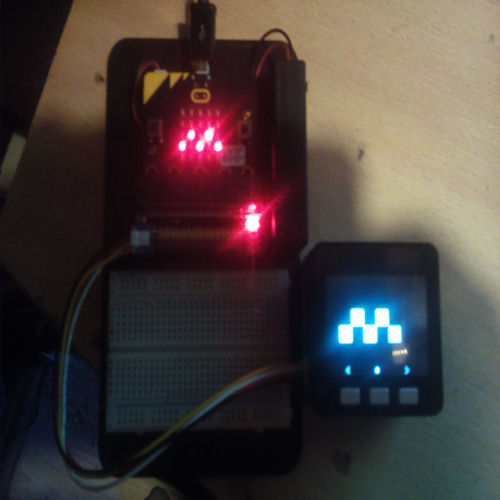
Turn your Micro-Bit leds on/off with the M5, create your own smilies on the M5.. ect..
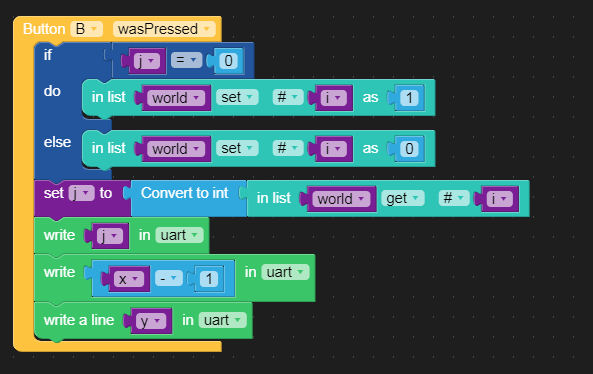
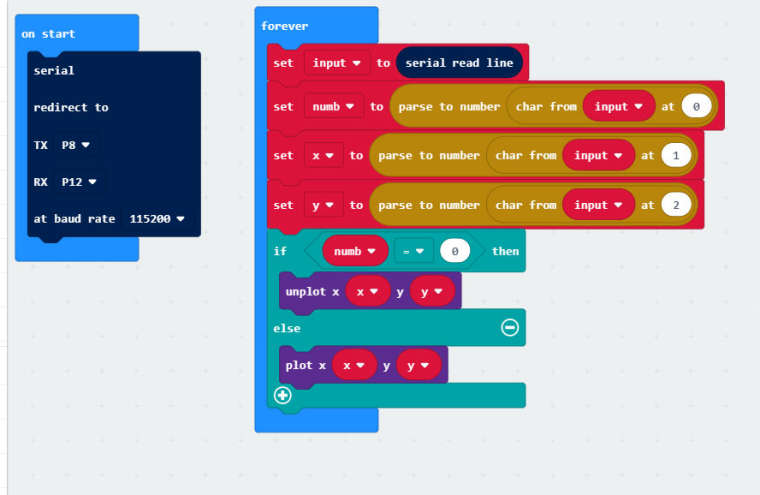
Here is the Micro-Bit code ;
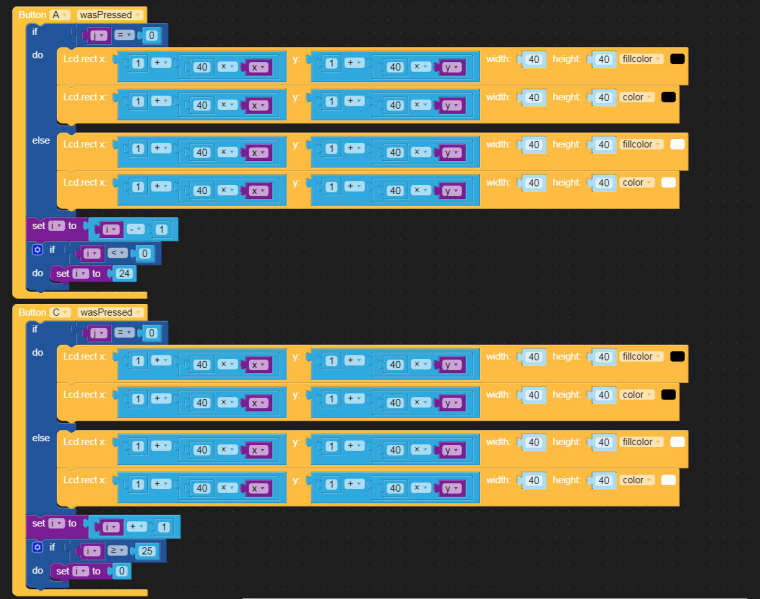
And te M5Stack code ;
#include <M5Stack.h>
#include <M5StackUpdater.h>

#define WIDTH 320
#define HEIGHT 240
#define BLOCK_SIZE  40
#define UNIT_WIDTH  5
#define UNIT_HEIGHT 5
#define UNIT_SIZE 25
#define GETX(i) ((i) % (5))
#define GETY(i) ((i) / (5))
int world[UNIT_SIZE];
int i;

void setup() {
  M5.begin();
  Wire.begin();
  if(digitalRead(BUTTON_A_PIN) == 0){
    Serial.println("Will load menu binary");
    updateFromFS(SD);
    ESP.restart();
  }
  Serial2.begin(115200, SERIAL_8N1, 16, 17);
  M5.Lcd.fillScreen(BLACK);
  M5.Lcd.setTextSize(2);
  M5.Lcd.setCursor(35, 220);
  M5.Lcd.println("  <       *       >");
    for (i = 0; i < UNIT_SIZE; i++) {
    world[i] = 0;
  }
  i = UNIT_SIZE / 2;
}

void loop() {
      M5.update();
      int x = GETX(i) + 1;
      int y = GETY(i);
      if (world[i] > 0) M5.Lcd.fillRect(x * BLOCK_SIZE + 1, y * BLOCK_SIZE + 1, BLOCK_SIZE - 2, BLOCK_SIZE - 2, LIGHTGREY);
      else M5.Lcd.fillRect(x * BLOCK_SIZE + 1, y * BLOCK_SIZE + 1, BLOCK_SIZE - 2, BLOCK_SIZE - 2, BLUE);
      if (M5.BtnC.wasPressed()) {
         if (world[i] > 0) M5.Lcd.fillRect(x * BLOCK_SIZE + 1, y * BLOCK_SIZE + 1, BLOCK_SIZE - 2, BLOCK_SIZE - 2, WHITE);
         else M5.Lcd.fillRect(x * BLOCK_SIZE, y * BLOCK_SIZE, BLOCK_SIZE, BLOCK_SIZE, BLACK);
         ++i;
         if (i >= UNIT_SIZE) i=0;
      }
      if (M5.BtnA.wasPressed()) {
         if (world[i] > 0) M5.Lcd.fillRect(x * BLOCK_SIZE + 1, y * BLOCK_SIZE + 1, BLOCK_SIZE - 2, BLOCK_SIZE - 2, WHITE);
         else M5.Lcd.fillRect(x * BLOCK_SIZE, y * BLOCK_SIZE, BLOCK_SIZE, BLOCK_SIZE, BLACK);
         --i;
         if (i < 0 ) i=UNIT_SIZE -1;
      }
      if (M5.BtnB.wasPressed()) {
        if (world[i] > 0) world[i]=0;
        else world[i]=1;
        Serial2.print(world[i]);
        Serial2.print(GETX(i));
        Serial2.println(GETY(i));
      }
}
On the M5; button A moves left, button C moves right and button B toggles the led, this shows on Micro-Bit and M5
-
MediaPlayerposted in PROJECTS
Music player, plays MP3, MOD and MIDI (from a playlist)
When your'e using LovyanLauncher just download and put it on your SD card and all done.
If your not using LovyanLauncher you still need the folders (mp3,mod,midi,txt) and burn the bin file.When the program starts you can choice play the play list sequential (button A) play random (button B) and manual play (button C).
If there is no playlist (pl.txt) in the txt folder it will jump to manual play after startup.The manual play needs some explanation, its used to choice and select a media file, play it and add to the playlist when it plays OK.
Fist select the type of file , MP3 MOD or MIDI, then you can scroll to the files with the B button (next), (it scrolls around after last jumps to first). (files that are already in the playlist are preceded with a *)
Press A to play it and when its not already in the playlist (and plays correct) you can add it to the list with button C (addpl).
Well add your own files, remember MP3.s goes in mp3 folder, MOD,s in the mod folder and yes MIDI's in the midi folder.
If you want, delete the playlist (pl.txt) to start with a fresh one ..
Do not remove the soundfont (1mgm.sf2) in the midi folder, midi needs this.Be aware that if you add manually files to the playlist with a txt editor or so.. that MP3 files precede with 1: MOD's with 2: and MIDI's with 3:
PS.. when you use external (stereo) headphone or speakers, pull 35 high (resistor about 10 k or so between 3.3 volt and pin 35) and it wil not force mono play. (not tested (yet) no idea if it works.. will get back on this later.. if someone can test it??)
-
RE: Micro-Bitposted in PROJECTS
@ajb2k3 Youre welcome.. I just saw the loop at the end was gone tho.. should be an (empty) loop under the red block..
-
Micro-Bitposted in PROJECTS
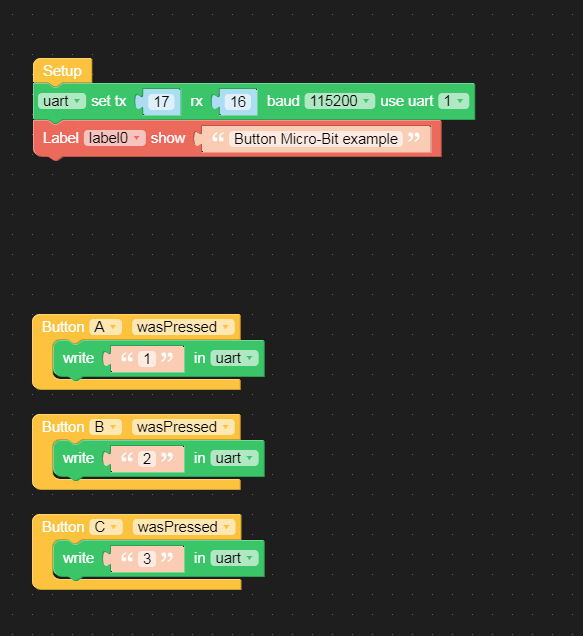
Simple test/demo to show how to communicate with the Micro-bit.

The Micro-bit program ;;
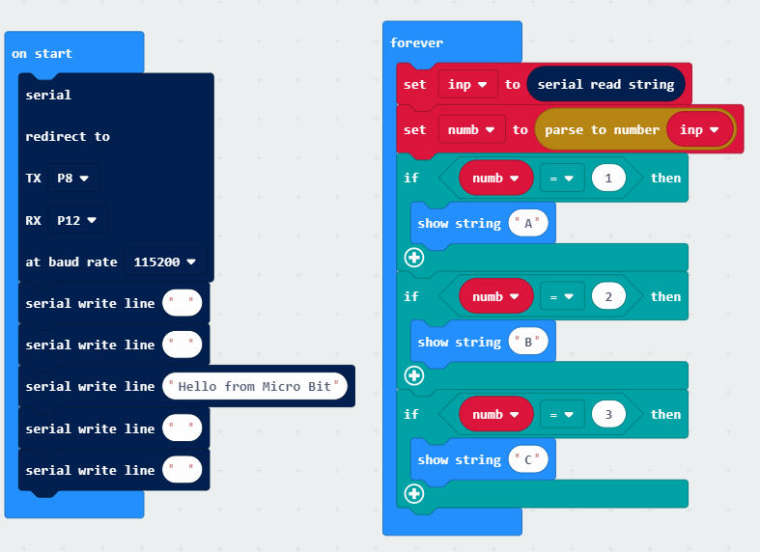
As javascript ;
let numb = 0
let inp = ""
serial.redirect(
SerialPin.P8,
SerialPin.P12,
BaudRate.BaudRate115200
)
serial.writeLine("")
serial.writeLine("")
serial.writeLine("Hello from Micro Bit")
serial.writeLine("")
serial.writeLine("")
basic.forever(function () {
    inp = serial.readString()
    numb = parseFloat(inp)
    if (numb == 1) {
        basic.showString("A")
    }
    if (numb == 2) {
        basic.showString("B")
    }
    if (numb == 3) {
        basic.showString("C")
    }
})
And the M5stack code (arduino)
#include <M5Stack.h>
#include <M5StackUpdater.h>


// The setup() function runs once each time the micro-controller starts
void setup() {
  M5.begin();
  Wire.begin();
  if(digitalRead(BUTTON_A_PIN) == 0){
    Serial.println("Will load menu binary");
    updateFromFS(SD);
    ESP.restart();
  }

  Serial2.begin(115200, SERIAL_8N1, 16, 17);
  M5.Lcd.clear(BLACK);
  M5.Lcd.setTextColor(YELLOW);
  M5.Lcd.setTextSize(2);
  M5.Lcd.setCursor(0, 10);
  M5.Lcd.println("Button Micro-Bit example");
  M5.Lcd.println();
}

// Add the main program code into the continuous loop() function
void loop() {
  // update button state
  M5.update();
  if(Serial2.available()) {
   char ch = Serial2.read();
   if ( (ch >+ 'A') && (ch +'z') )M5.Lcd.write(ch);
  }
  if (M5.BtnA.wasReleased()) {
    Serial2.write('1');
  } else if (M5.BtnB.wasReleased()) {
    Serial2.write('2');
  } else if (M5.BtnC.wasReleased()) {
    Serial2.write('3');
  }
}
If you have a Micro-bit I suppose you know how to put the code in (I use makecode (offline) online version schould work the same..
and then use the arduino to program the M5stack....
Then press button A on the M5 and the Micro-bit shows a A..
Same with button B and C...Just for fun and to show how to communicate with the micro-bit..
-
RE: Serial2 on M5StickCposted in M5 Stick/StickC
Pin 36 can only be set as input, so 36 has to be rx
-
RE: M5Stack 2 Channel Oscilloscopeposted in PROJECTS
@chriswr Ok solved.. disable the watchdog..
disableCore0WDT();
disableCore1WDT(); -
RE: M5Stack 2 Channel Oscilloscopeposted in PROJECTS
Its restarting every 5 seconds making it useless.. what can be my problem?
-
UIFlow on SD Updaterposted in UIFlow
Would it be possible to use the Ui-Flow firmware (micro python) in SD Updater? read and execute from SD and return to the menu with reset btn A..
Making it in one BIN file or using a loader bin file that loads the file like M5Burner does but then inside M5Stack..
Return to the menu could probably be done with a micro python program that loads and execute from SD
Has anyone experience with this?
