UIFlow digital input interrupt
-
In UIFlow is it possible to use an interrupt on an input? when I get a sub millisecond low signal on an input I would like to run some code.
-
When you say sub millisecond I guess you are not going to use a button to interrupt, if so then how do you intend to interrupt from an input
-
50hz triac phase control with zero crossing timing synchronization. 100micro second timing tolerance or better. I ended up porting to Arduino/C++, too many limitations with UIFlow for now, python maybe to slow anyway. UIFlow is a good tool for higher level/basic control.
-
Hello,
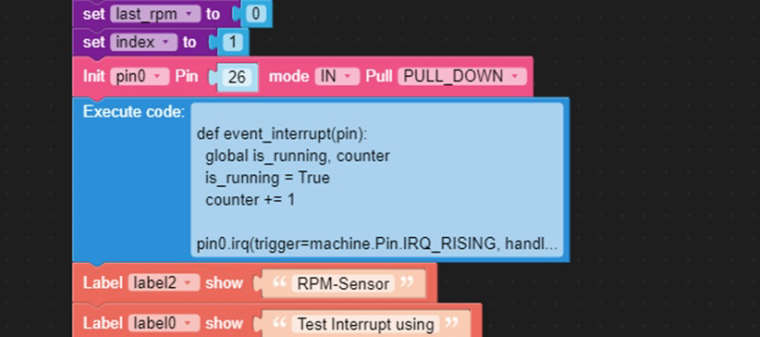
try an execute block, look at my code below.First i defined the two variables "is_running" and "counter".
In UIFlow i defined pin0 with GPIO26 as input with pull down resistor.!
Then i defined the event_interrupt(pin) - procedure. I use it for counting impulses at the GPIO26, therefore it is necessary to declare the variables as globals.Every second i read in the main loop the value of the counter variable and reset the is_running variable.
def event_interrupt(pin):
global is_running, counter
is_running = True
counter += 1pin0.irq(trigger=machine.Pin.IRQ_RISING, handler=event_interrupt)

-
@Gaviota
hello and thank you for your information.
Would you be so kind to post the full code?
It doesn't work for me - i always get a syntax error.Thanks in advance,
Schubi
-
@Gaviota
Hello Gaviota,
thank you for sharing this information.I tried to implement it, but i get an error.
Would you be so kind to post the whole program?Thank you in advance,
Schubi
-
@Gaviota
hello Gaviota,
i tried to run your code, but i always get an error.
Would you be so kind to post the full program so i can find my mistake.Thank yo in advance,
Schubi -
@Gaviota post was helpful to me. Thanks.
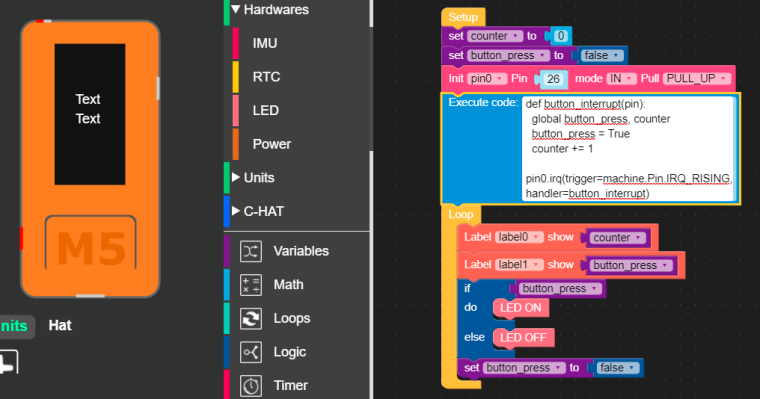
Below is an example of a N/O button interrupt, connected between G26 and GND.
Counter increments multiple times per button push.
This shows that software debounce could be necessary in many cases.
Cheers - BillT

-
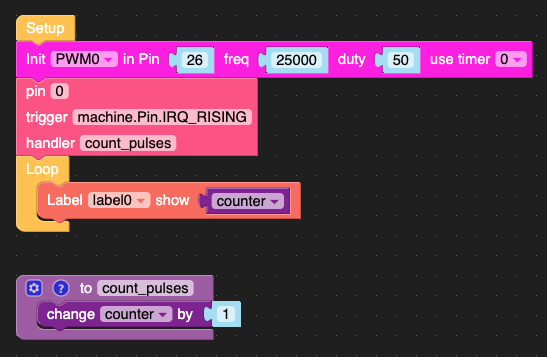
I've created a custom module to avoid the need to use the "Execute" block. It basically gives you a way to set the pin number, trigger, and callback for the IRQ. You will still create your own function using Blockly.
- Create a Variable: example "counter"
- Create a Function:
- Name it what you like, example: "count_pulses"
- Add single step from Variables: change counter by 1
- Init PWM0 with your desired pin, freq, and duty
- Load the attached file under Custom | Open *.m5b file
- Drag "PIN_IRQ" from Custom onto your workspace
- Set the pin number (just an integer, 0 for example)
- Set your trigger "machine.Pin.IRQ_RISING"
- Set the handler to your function from step 2 above "count_pulses"
- Add a label if you want and set the loop event to update a label with the current counter value
- It sounds more complicated than it actually is, check the screenshot

Your resulting code should look vaguely like this:
from m5stack import *
from m5ui import *
from uiflow import *
import machine

setScreenColor(0x222222)

counter = None

label0 = M5TextBox(146, 187, "Text", lcd.FONT_Default, 0xFFFFFF, rotate=0)

from numbers import Number

def count_pulses():
  global counter
  counter = (counter if isinstance(counter, Number) else 0) + 1

PWM0 = machine.PWM(26, freq=25000, duty=50, timer=0)
pin0.irq(trigger=machine.Pin.IRQ_RISING, handler=count_pulses)
while True:
  label0.setText(str(counter))
  wait_ms(2)
Have fun storming the castle!
-
@lyledodge I can’t see attached file. Is there any or it problem with my iPhone?
-
Hi @Gaviota.
Currently I'm still learning to use UI Flow IDE and I want to crate the same thing- counting pulses and showing them on the screen. Can you send me your Blocky?
Thanks,
Bozho -
A digital input interrupt in UIFlow is used to respond instantly to changes in the state of a pin, such as the pressing or releasing of a button. Instead of constantly checking the pin, you set an interrupt on a chosen GPIO with rising, falling, or changing detection. The callback function is triggered by this event, making your program more efficient and responsive to real-time input without using excessive processing power.
-
@bozho did you have any luck. It is clear on Uiflow1 how to detect rising inputs but I don't see this on Uiflow2...or is this is actually what is meant by the 'button press' block on the 'pin button' hardware module?