video stream (computer desktop) to m5stickc plus
-
Hey guys,
did anyone manage to get a video stream sent to the m5stickc plus?
I tried arduinovnc (https://github.com/arrowmeiwaracing/arduinoVNC?fbclid=IwAR1vOuny18o9wrglFqjgbwdrZoi4gQcSjo3NIENHpCoqyYhq_stlqAebrO8)
Everything seems to work in term of connection etc but I get stuck with a single glitchy frame :/I also found this that look even more promising
https://blog.chaosgoo.com/2020/12/14/ESP32-Streaming/
but same, I got everything running (python get the connection and the m5 print on the serial that he is receiving the frames ) except nothing is showing on the screen :s
I pretty much left the code as it is ( using the TFT_eSPI lib ) and thats probably what is wrong, I assume everything should be using m5.lcd instead.
I have no idea how to do this, if anyone understand it , any feedbacks would be welcome ))thank you!
-
https://github.com/Bodmer/TFT_eSPI#tips
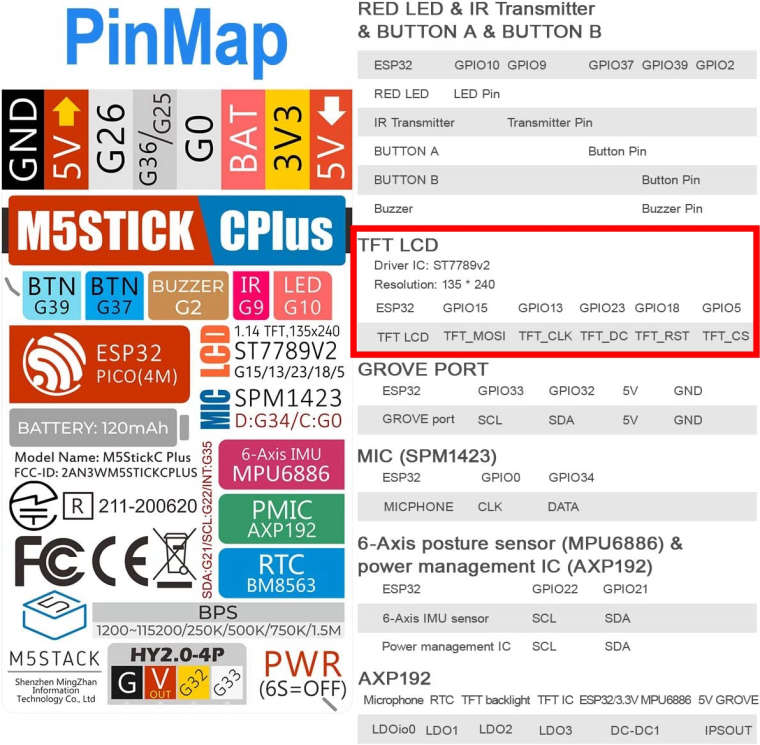
edit User_Setup.h or renameSection 1. Call up the right driver file and any options for it
// Only define one driver, the other ones must be commented out
//#define ILI9341_DRIVER       // Generic driver for common displays

#define ST7789_2_DRIVER    // Minimal configuration option, define additional parameters below for this display
// #define M5STACK // For ST7789, ST7735, ILI9163 and GC9A01 ONLY, define the pixel width and height in portrait orientation // #define TFT_WIDTH 80 #define TFT_WIDTH 135 //128->135 // #define TFT_WIDTH 172 // ST7789 172 x 320 // #define TFT_WIDTH 240 // ST7789 240 x 240 and 240 x 320 // #define TFT_HEIGHT 160 // #define TFT_HEIGHT 128 #define TFT_HEIGHT 240 // ST7789 240 x 240 // #define TFT_HEIGHT 320 // ST7789 240 x 320 // #define TFT_HEIGHT 240 // GC9A01 240 x 240Section 2. Define the pins that are used to interface with the display here
// For NodeMCU - use pin numbers in the form PIN_Dx where Dx is the NodeMCU pin designation
//#define TFT_CS   PIN_D8  // add //
//#define TFT_DC   PIN_D3  // add //
//#define TFT_RST  PIN_D4  //add //

// For ESP32 Dev board (only tested with GC9A01 display)
// The hardware SPI can be mapped to any pins

#define TFT_MOSI 15 // In some display driver board, it might be written as "SDA" and so on.
#define TFT_SCLK 13
#define TFT_CS   5  // Chip select control pin
#define TFT_DC   23  // Data Command control pin
#define TFT_RST  18 // Reset pin (could connect to Arduino RESET pin)
//#define TFT_BL   22  // LED back-light
Section 4. Other options
// #define SPI_FREQUENCY 27000000 #define SPI_FREQUENCY 40000000 //from Setup135_ST7789.h -
@flypeek said in video stream (computer desktop) to m5stickc plus:
genius, I completely miss that part and was trying to set my pins in my main sketch.
thank you so much I am in -
adding notes :
the M5stickc plus uses an AXP192 for power management (including display), all the functions to initialise it are inside the M5StickCPlus but you can't call this library in same time as TFT_eSPI.h.
you will have to copy AXP192.h & AXP192.cpp from the M5StickCPlus lib and put it in your project (change the names).If you have a M5 project loaded in your stick and then upload a sketch using TFT_eSPI, it will work the first time as the display is already power on from the previous m5 sketch but the display won't turn back on on the next restart unless you init the AXP192 like explained.
hope it helps anyone!