Core 2 bricked after attempting to install firmware
-
@robski That is correct.
-
@ajb2k3 No go. No errors and no lights on the Core2. It's just dead.
-
@ajb2k3 said in Core 2 bricked after attempting to install firmware:
Failing that you will need to remove the base and connect a USB to UART adapter to the internal TX/RX pins and override the core2's onboard adapter
Having a similar issue with one of my two Core2 v1.1's I am wondering how this works exactly? I assume we are talking about the 4pin connector with (DP, DM, GND, 5V)? In which case DP/DM is TX/RX - although I am not sure which would be which.
@ajb2k3 said in Core 2 bricked after attempting to install firmware:
Try removing the base, hold the reset button (next to the card slot), plug the USB cable in.
Does not seem to do anything. Although I do seem to on rare orations be able to get it into some state where the computer recognises it as a serial port. But it also seems not to actually work when I try to write to it.
@ajb2k3 said in Core 2 bricked after attempting to install firmware:
One thing I did find is that the driver on the host computer is very unstable and prone to hard crashing. When you get a hard driver crash you need to do a hard shutdown of the computer. which means the host computer MUST be fully powered of for 30 seconds ignorer for the host computers ram to be wiped of data!
Having two devices sort of rules that out. The other device works without issue for now.
-
In windows 11, does the system control panel show any errors on the com ports?
-
If you have a COM issue that when you hit the power button COM port connect and disconnects. Press the power button and when the port connects press and hold the reset button. Hold it until you start flashing the new files.
-
None of the tricks with holding buttons does anything for the device I have that does not present a serial port over USB. While I'm mainly on macOS I can't make it do anything in Windows either. There I will just have an "Unknown USB Device (Device Descriptor Request Failed" entry in Device Manager.
So I'm more interested in how to connect directly to the internal TX/RX pins. But I am not entirely sure how to access them on this board.
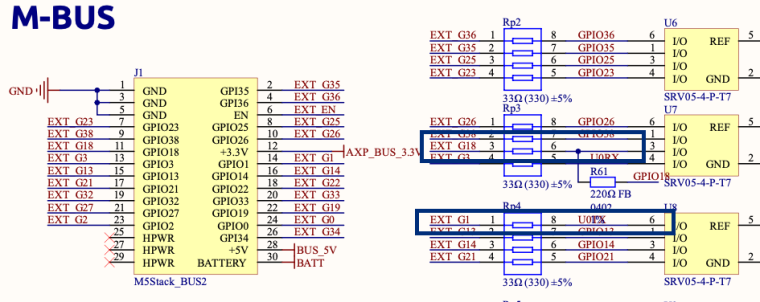
Looking at the schematics more closely It seems the on-board connector is also for USB. But I am having a little trouble figuring out if any of the "M-BUS" pins connect. Maybe G1 and G18? G1 makes sense from the markings (TXD0). But G18 is marked as SCK (So a clock signal?) and G3 (marked RXD0) would make more sense.
-
@ajb2k3 No errors. The device itself has no lights that come on at all, even the blue on next to the SD slot. Win11 shows no COM errors when it is plugged in. Yes, multiple cables, multiple USB slots.
-
@mrmcquaid tried that many times - it just seems to be burnt out. It wont flash, no lights. There is the quick succession of beeps where the computer notices something has been plugged in, then the beep of it disconnecting. In the burner the COM port flashes a number then goes back to blank.
-
Have you tried updating the CH9102 usb drivers?
yes, GPIO 1 and 3 are the pins you need to directly connect to.
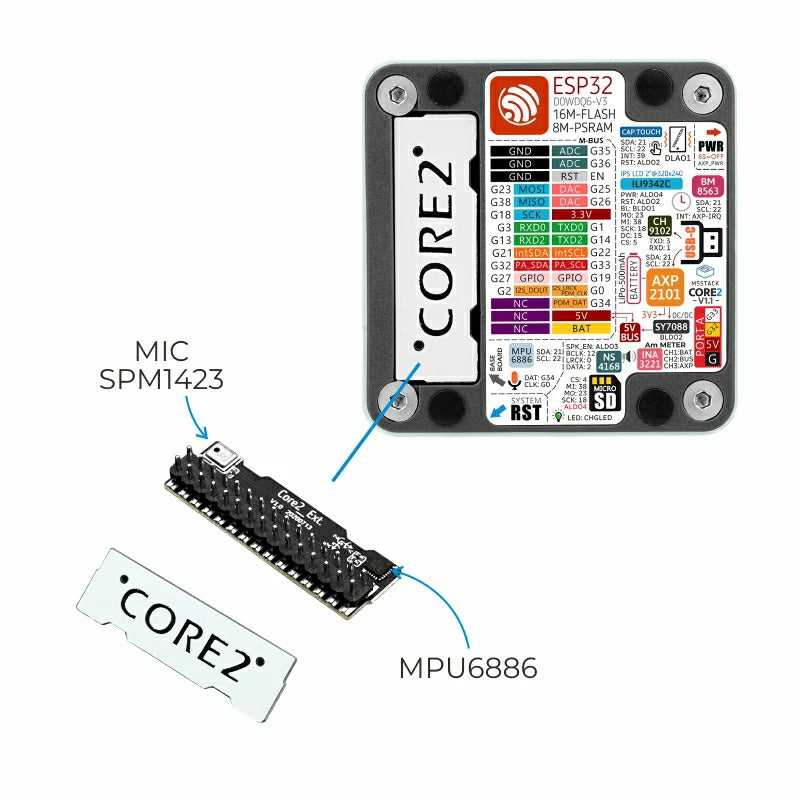
if you look at the sticker on the base
it sows which pins you need to use to bypass the CH9102.
If you have an arduino you need to program it as an ISP and then M5Burner should allow it to work instead of the CH9102 chip for programming.
Just remember that the Programmers TX must be connected G3 RXD and the programmers RX pin must be connected to G1 TXD pin along with the GND pin.
Connect 3v3 to the 3.3V pin or 5V to the 5V pin, do not connect both and do not have any other cables plugged in!
-
@ajb2k3 said in Core 2 bricked after attempting to install firmware:
Have you tried updating the CH9102 usb drivers?
No. For me I have two identical devices. One works without issue. The other does not. On both macOS and Windows 11.
@ajb2k3 said in Core 2 bricked after attempting to install firmware:
yes, GPIO 1 and 3 are the pins you need to directly connect to.
Ah okay. My confusion is from here. That could indicate 1 and 18. But I realise now the wire that hits G18 is not what is labeled U0RX.

-
@kristoffer Its easy to get confused because the ESP32 does not have fixed pin function but has a function matrix. stick to the pins marked on the labels.
-
@ajb2k3 said in Core 2 bricked after attempting to install firmware:
Just remember that the Programmers TX must be connected G3 RXD and the programmers RX pin must be connected to G1 TXD pin along with the GND pin.
Connect 3v3 to the 3.3V pin or 5V to the 5V pin, do not connect both and do not have any other cables plugged in!
Hmm. No go with two different FT232R adaptors. Maybe I did manage to damage it somehow. It still boots and runs the factory test though. So the chip and board does seem to be functional.
.. Or maybe something else it wrong. Trying to flash through the pins does not seem to work on my Core2 that works on USB.
-
This post is deleted! -
@ajb2k3 said in Core 2 bricked after attempting to install firmware:
Connect 3v3 to the 3.3V pin or 5V to the 5V pin, do not connect both and do not have any other cables plugged in!
Just to clarify. You don't do anything specific to bring it into boot loader mode? ESP32 documentation seems to indicate one should bring GPIO 0 low (attach it to GND) to force this.
Not I did once manage to make a FT232R programmer work with it as I was messing with some combination of that and a few other things. So I think I managed to erase it. But I am not having much success replicating and getting another connection.
-
does anyone know how to hard reset with arduino cause my m5stack cardputer is showing the error with no serial data recived.... please help me i just got it
-
@kristoffer The Stock adapter in the Core2 has the swiping electronics to pull gpis) low without user action.
@willyam said in Core 2 bricked after attempting to install firmware:
does anyone know how to hard reset with arduino cause my m5stack cardputer is showing the error with no serial data recived.... please help me i just got it
What did you install and what OS are you using?
Try opening M5Burner, switching on the card computer Press and hold BTNGO and press and release BTNrst.
M5Burner should flash up a blue box with a port number.
-
I pulled the battery and pressed the Reset button whilst reconnecting to USB. This got the device to boot and be detected correctly. I couldn't erase the bad flash, but I flashed the stock firmware back using M5 Burner , this worked.