Blynk on M5Stack via uiFlow and block-maker
-
Tried this and got AttributeError "module object has no attribute blynk" :|
-
@lastcaress said in Blynk on M5Stack via uiFlow and block-maker:
Tried this and got AttributeError "module object has no attribute blynk" :|
Not sure exactly where it failed for you. Can you provide more detail on how far you got before seeing the error?
-
@world101 I managed to copy the blinklyb file to the m5stack, and the m5f and m5b files you provided. I think this error refers to :
blynk = BlynkLib.Blynk(BLYNK_AUTH)
I don't think it understands this line!
Thanks -
It manages to import the library, it just doesn't understand that attribute!
-
If it doesn’t understand that line it may not have imported the library correctly. Did you put it in the /flash/lib directory on the m5stack? Also, just wanted to make sure you are running the latest v1.1.2 firmware.
Did you paste your Blynk Auth Key into the flow before running it in uiFlow?
Also, are you able to access the REPL prompt? If not I can show you how. It’s good for troubleshooting.
-
I am running the latest firmware and I uploaded the BlynkLib.py file from the git repo you linked using rshell to /flash/lib :P I used a raspbian os to it as I've never been able to use ampy! The import BlynkLib line of code doesn't cause any error. I did paste the auth key :D
I do not know how to access the repl prompt though! -
So I got hold of a macbook and tried via ampy and.. it works!! I should've tried this before as my attemps at using the blynk python library probably didn't work before because I used rshell and maybe it sends the file in a different format? This is very nice!
-
@lastcaress said in Blynk on M5Stack via uiFlow and block-maker:
So I got hold of a macbook and tried via ampy and.. it works!! I should've tried this before as my attemps at using the blynk python library probably didn't work before because I used rshell and maybe it sends the file in a different format? This is very nice!
Ampy didn't work on my macbook pro and it took me ages to find out that my pythone was P3 but I hadn't set up the enviroment shell correctly.
Glad it works. -
Sweet, I got this to work as well.
Looks like something else to add to the project list. -
Glad you all got it working. To access REPL, you can do this from the Mac Terminal with the M5Stack connected to a USB port.
screen /dev/tty.SLAB_USBtoUART 115200You may not see anything at first, so you can press CTRL+C on the keyboard to drop you into the REPL prompt (>>>). From there, you can do your regular MicroPython commands. For example...
>>> os.listdir()
['image_app', 'main.py', 'emoji', 'sys_lib', 'config.py', 'lib', 'res', 'flow.py', 'blocks', 'apps', 'debug.py', 'modeconfig.json', 'boot.py', 'img']
>>> os.listdir('lib')
['servo.py', 'square.py', 'step_motor.py', 'm5_pin.py', 'm5bala.py', 'wave.mpy', 'lego_board.py', 'bmp280.mpy', 'dht12.mpy', 'mpu6050.py', 'chunk.mpy', 'pid.py', 'lego.py', 'BlynkLib.py']
>>> import BlynkLib

    ___  __          __
   / _ )/ /_ _____  / /__
  / _  / / // / _ \/  '_/
 /____/_/\_, /_//_/_/\_\
        /___/ for Python v0.2.0

>>> help()
Welcome to LoBo MicroPython for the ESP32

For online documentation please visit the Wiki pages:
https://github.com/loboris/MicroPython_ESP32_psRAM_LoBo/wiki

Based on official MicroPython, this port brings many new features:

 - support for two cores and 4MB SPIRAM (psRAM)
 - improved 'network' module
 - greatly improved thread support
 - support for 3 different internal file systems on top of ESP32 VFS
 - ESP32 native support for SD Card
 - built-in FTP & Telnet servers
 - support for OTA updates
 - many new and improved hardware access modules implemented in C
 and many more...

Control commands:
  CTRL-A        -- on a blank line, enter raw REPL mode
  CTRL-B        -- on a blank line, enter normal REPL mode
  CTRL-C        -- interrupt a running program
  CTRL-D        -- on a blank line, do a soft reset of the board
  CTRL-E        -- on a blank line, enter paste mode

For further help on a specific object, type help(obj)
For a list of available modules, type help('modules')
>>> help('modules')
__main__          m5flow/m5mqtt     math              uerrno
_thread           m5flow/m5stack    microWebSocket    uhashlib
ak8963            m5flow/peripheral microWebSrv       uheapq
array             m5flow/simple     microWebTemplate  uio
binascii          m5flow/ubutton    micropython       ujson
btree             m5flow/unit/adc   mpu6500           uos
builtins          m5flow/unit/button                  mpu9250           upip
cmath             m5flow/unit/color network           upip_utarfile
collections       m5flow/unit/dac   os                upysh
display           m5flow/unit/dual_button             pye               urandom
errno             m5flow/unit/ext_io                  random            ure
freesans20        m5flow/unit/ir    re                urequests
functools         m5flow/unit/ncir  select            uselect
gc                m5flow/unit/relay socket            usocket
hashlib           m5flow/unit/rgb_  ssd1306           ussl
heapq             m5flow/unit/tof   ssl               ustruct
io                m5flow/units      struct            utime
json              m5flow/utils      sys               utimeq
logging           m5flow/wifichoose time              uzlib
m5base            m5flow/wificonfig tpcalib           websocket
m5flow/app_manage m5flow/wifisetup  ubinascii         writer
m5flow/i2c_bus    m5ui              ucollections      ymodem
m5flow/m5cloud    machine           uctypes           zlib
Plus any modules on the filesystem
>>>
etc...
Or if you don't go into the REPL prompt, but still have the screen session connected, you can see the serial logs from the m5stack. Reboot the M5stack and you should see the Blynk start up, plus some other useful information (network connection, connection to M5cloud, etc.).
To exit the screen session press CTRL+A then CTRL+\ then y.
-
By the way, I haven't found a way to import existing m5b files into block-maker.m5stack.com, so here are the ones I created. Feel free to play around with them and even create some new ones! The official Blynk colors are here: http://docs.blynk.cc/#blynk-main-operations-change-widget-properties
Blynk Init:
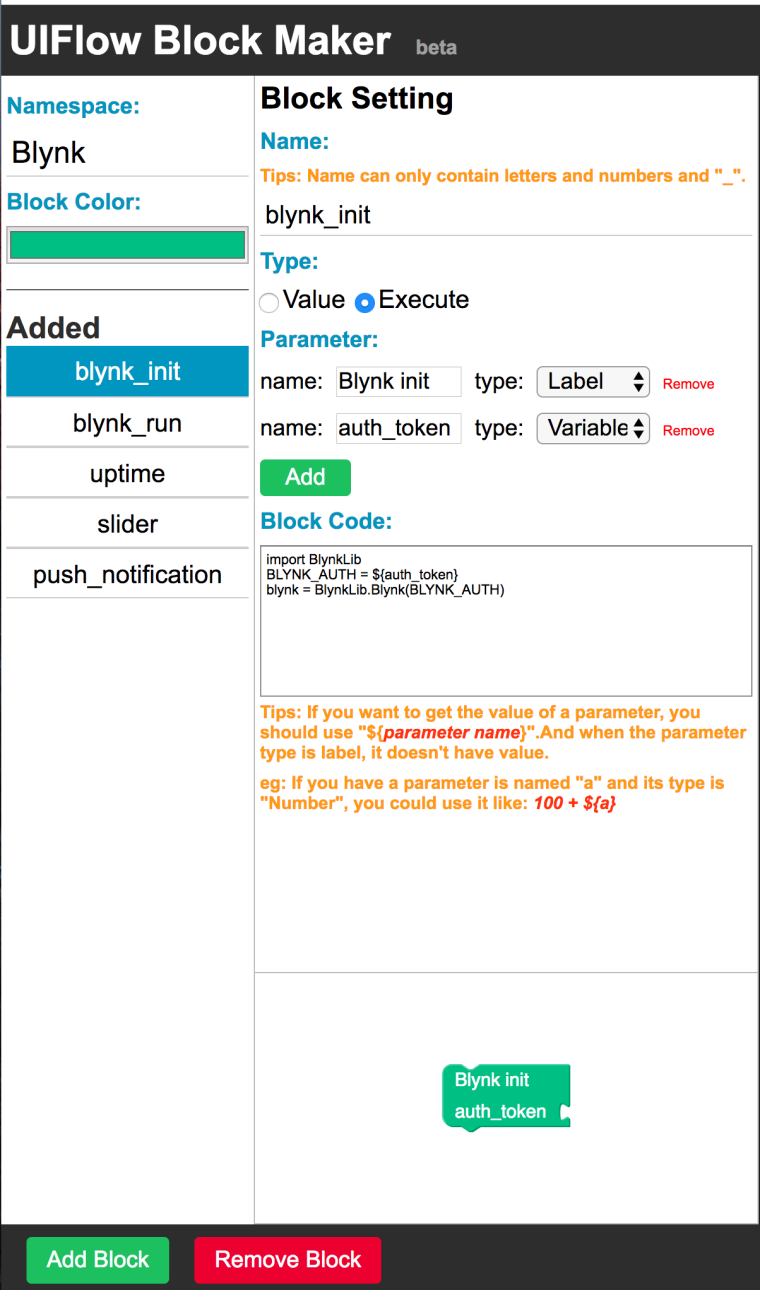
import BlynkLib
BLYNK_AUTH = ${auth_token}
blynk = BlynkLib.Blynk(BLYNK_AUTH)
Blynk Run:
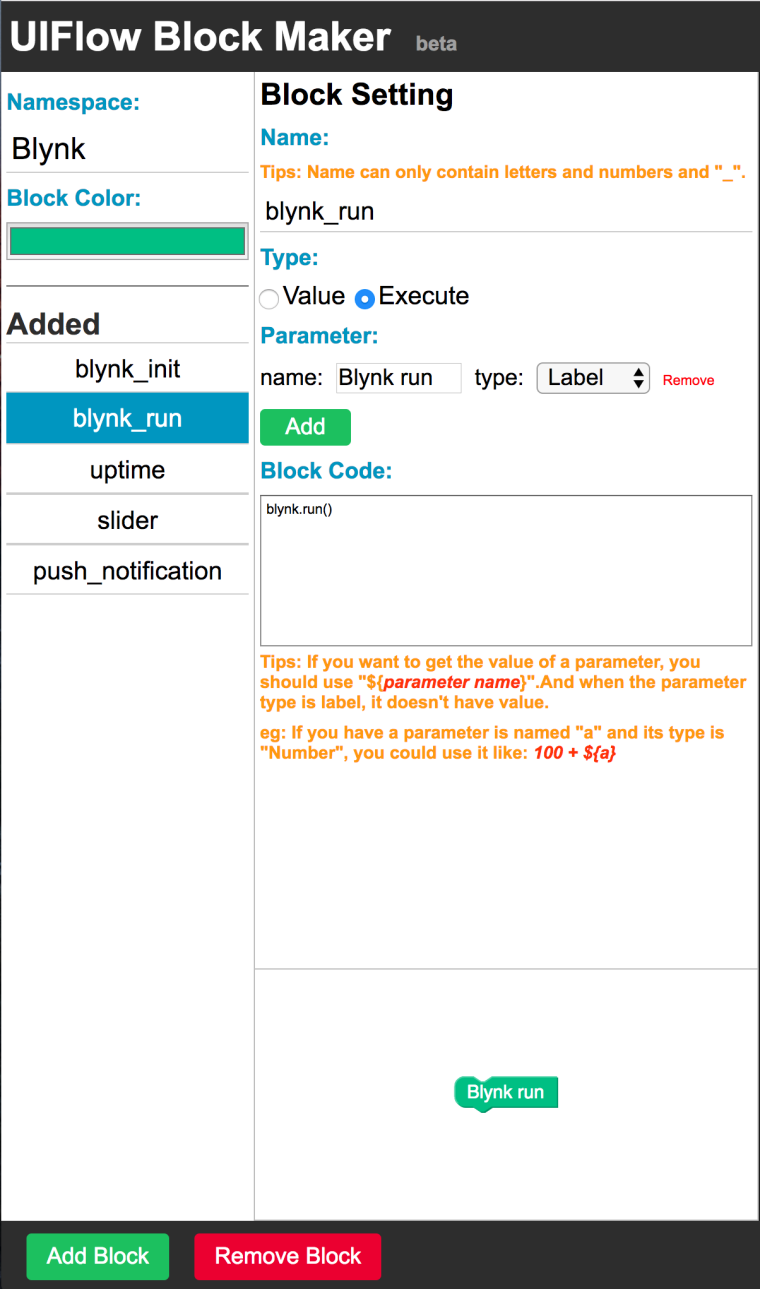
blynk.run()Uptime:
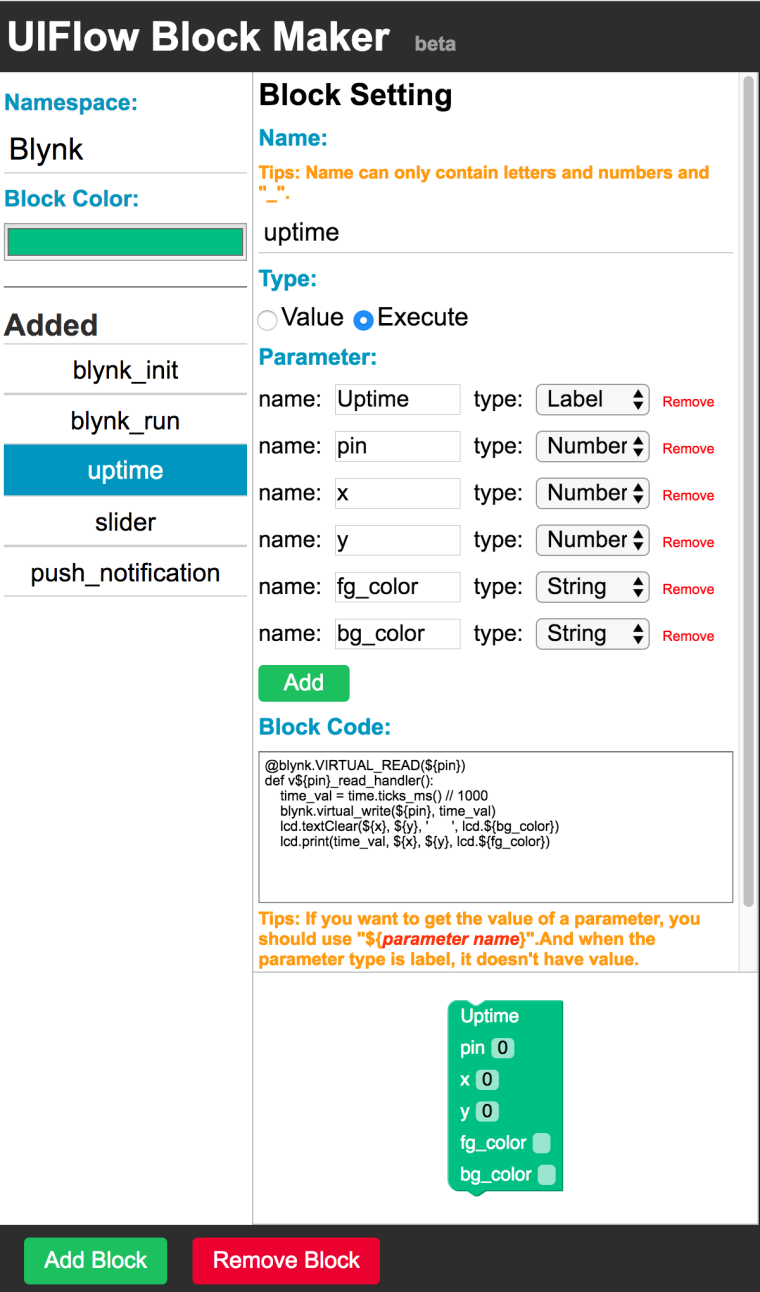
@blynk.VIRTUAL_READ(${pin})
def v${pin}_read_handler():
    time_val = time.ticks_ms() // 1000
    blynk.virtual_write(${pin}, time_val)
    lcd.textClear(${x}, ${y}, '      ', lcd.${bg_color})
    lcd.print(time_val, ${x}, ${y}, lcd.${fg_color})
Slider: (Note, this is slightly different than the tutorial above. I was experimenting with passing a variable into the block. Feel free to adjust it as needed)
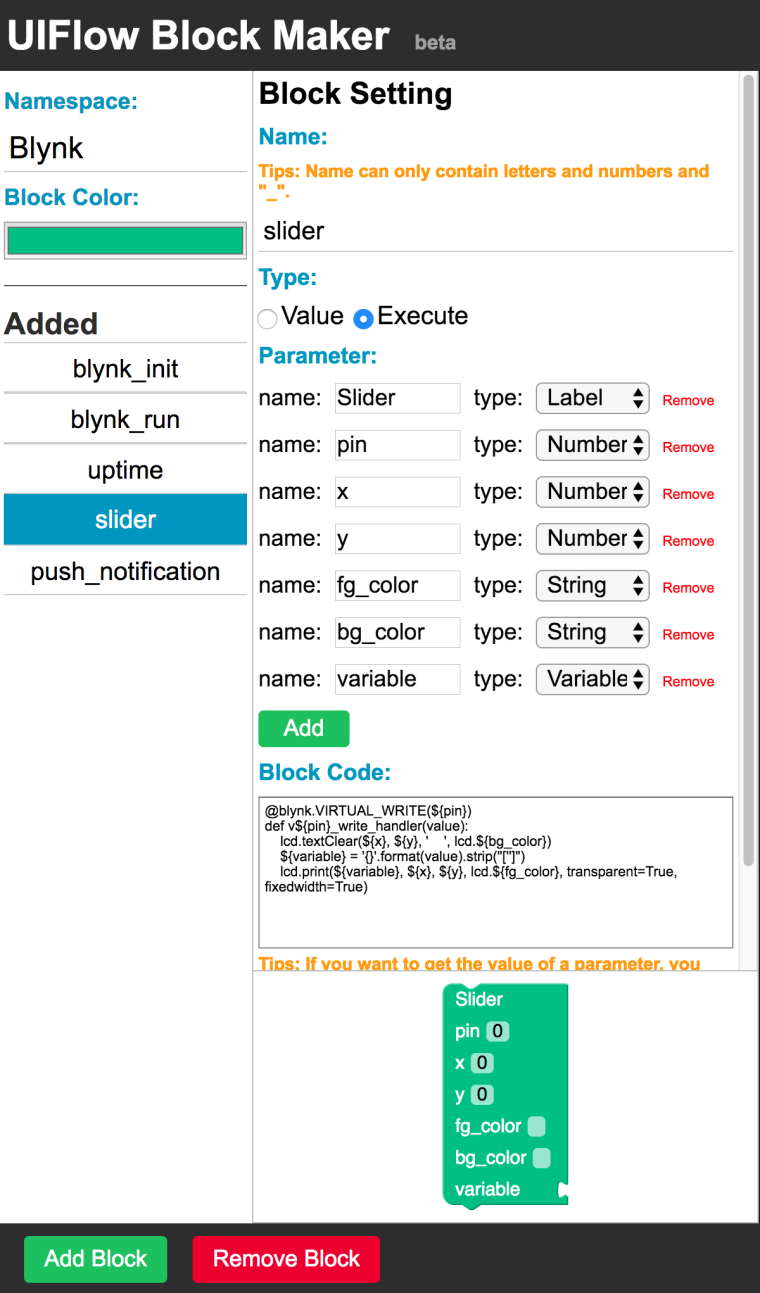
@blynk.VIRTUAL_WRITE(${pin})
def v${pin}_write_handler(value):
    lcd.textClear(${x}, ${y}, '    ', lcd.${bg_color})
    ${variable} = '{}'.format(value).strip("['']")
    lcd.print(${variable}, ${x}, ${y}, lcd.${fg_color}, transparent=True, fixedwidth=True)
Push Notification:
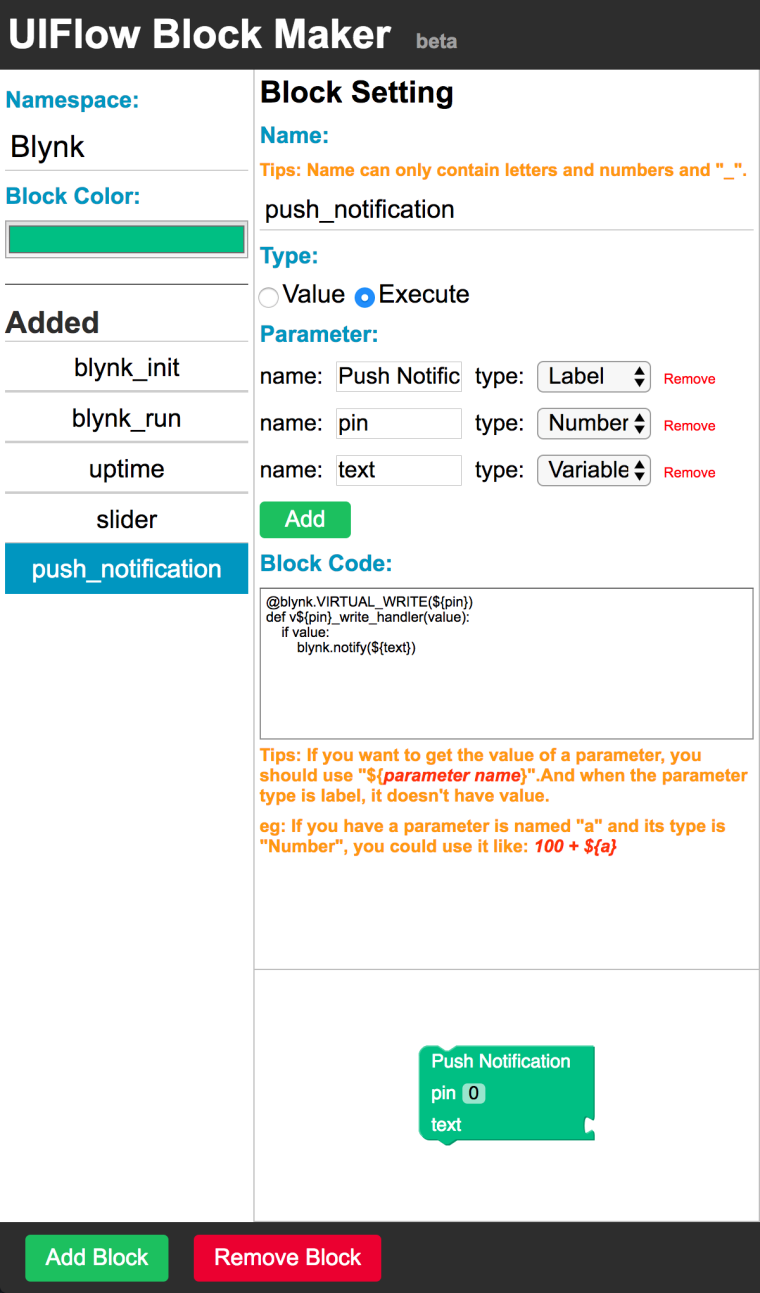
@blynk.VIRTUAL_WRITE(${pin})
def v${pin}_write_handler(value):
    if value:
        blynk.notify(${text})
I'm really interested in how to link blocks together, like the m5stack team did for the MQTT blocks. But I'll start a new thread on that soon.
-
Can you pm me your real name as I would like to credit you in my book for all the hard work on M5Blynk
-
Very cool! Can't wait to try it out!
-
I just noticed the Blynk developers released a new version 0.2.0 of blynk-library-python on git hub. I seems to have some additional advanced features like
- debug logging
- custom server
- changing heartbeat
- connected/disconnected events
- generic virtual pin events
- BlynkTimer
I have not tried this out yet, but plan to in the next week or so. In case you wanted to try the older version of the library, here is the commit:
https://github.com/vshymanskyy/blynk-library-python/commit/4cbf641fade72a11e797436a8656ebf28f239801 -
@world101 I managed to build a private server on Saturday but having auto startup issues.
I’ve tried the guide but still have to manually start the server -
@ajb2k3 said in Blynk on M5Stack via uiFlow and block-maker:
@world101 I managed to build a private server on Saturday but having auto startup issues.
I’ve tried the guide but still have to manually start the serverWhat platform did you build the local server on (Linux, RPi, etc)?
-
@world101 RPI 2B
-
Try the following:
edit the crontab
pi@raspberrypi:~ $ crontab -e
no crontab for pi - using an empty oneSelect an editor. To change later, run 'select-editor'.
- /bin/ed
- /bin/nano <---- easiest
- /usr/bin/vim.tiny
Choose 1-3 [2]: 2
Go to the end of the file and add the following command. Do not forget to modify the path to match your installation directory.@reboot java -jar /home/pi/server-0.23.0.jar -dataFolder /home/pi/Blynk &
-
That’s the one I followed and still not auto loading. Will have another go tonight
-
@world101 Got everything working using UiFlow V1.2!