Lesson 4.1. I2C. Weather station
-
Step 1. Go to the folder Arduino-ESP32-IDE and open the app arduino.exe (Fig. 1);

Figure 1. The archive with the Arduino IDE extracted to the folderStep 2. Select New in the File menu (Fig. 1.1);

Figure 1.1. Create a new sketchStep 3. Select Include Library, M5Stack in the Sketch menu (Fig. 1.2);

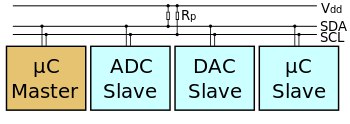
Figure 1.2. Connection library M5StackStep 4. Prepare the temperature sensor and humidity DHT12 (Fig. 2), which work on the I2C (Wire library.h) (Fig. 2.1).
I2C is asymmetrical bus to communicate between integrated circuits in electronic devices. It is used two bidirectional communication lines (SDA and SCL) (Fig. 2.2) to connect low-speed peripheral components to the processors and microcontrollers.
Figure 2. Temperature sensor and humidity DHT12
Figure 2.1. An example of a circuit design with one main microcontroller
Figure 2.2. Tactics sequence of data transmissionStep 5. Write a simple sketch, which main task will be the output temperature in degrees Celsius on the display (if 27 and below, green if above, red color) (Fig. 3);

Figure 3. Our sketchStep 5. Click the Upload button (Fig. 4) in order to flash the device;

Figure 4. Download the firmware to the deviceStep 6. When the device firmware is completed, the screen will display the temperature (Fig. 5, 5.1) :)

Figure 5. Temperature 25 degrees Celsius
Figure 5.1. Temperature is 29 degrees Celsius